Deploying server-side Kotlin Ktor applications on Dokku
In my last article, I talked about “[Publishing server-side Kotlin applications built with Ktor on Heroku]({% post_url 2021-01-15-Kotlin-on-heroku %})”. I really like Heroku as a place to host my Kotlin apps because the time from setting up my application to having it available to the public is very short – I can confidently get my prototype applications running in the cloud in less than 10 minutes, and even if I need a database or integration with some other service, it can be spun up in mere minutes.
But there are also situations where I want to own the deployment environment for my Kotlin (mainly Ktor) web applications – for example, when I’m deploying an app that’s running in my home network, or when I want to keep the application running without continuously having to pay for always-on Heroku instances. But even in those situations, I don’t want to give up all the convenience that I’ve gotten used to when using Heroku.
Enter Dokku, which unites the best of both worlds. With the tagline “The smallest PaaS implementation you’ve ever seen”, it’s an open-source run-it-yourself Platform as a Service (PaaS) based on Docker which makes it possible to push applications to production via Git. It can be easily installed on a Linux machine running in your home or rented from a hosting provider.

And the best part: in many ways, it’s actually compatible with the configuration we would use to deploy our application to Heroku, and generally provides a similar developer experience – even down to the level of buildpacks, which automate most parts of the deployment process for us!
However, because we are in control of the actual target platform ourselves, there are some key differences.
In this post, I want to walk through how to deploy a sample Kotlin application (which uses Ktor) to a Dokku installation. Especially in the first part, you’ll see a lot of parallels to my previous article, as the configuration is very similar. As we work our way towards the actual deployment, however, you’ll notice a bunch of differences, which have prompted me to write a separate article for Dokku specifically.
Prerequisites
For this walkthrough, I assume that you already have a Dokku installation running – either in a virtual machine, on a server you rented with some provider, or on a machine on your home network. If that’s not the case, you can simply follow the installation instructions in Dokku’s excellent documentation page. As long as you have a server running Debian or Ubuntu, there’s nothing standing in the way of spinning up your own Dokku instance with a single bootstrap command.
Out of the box, Dokku already comes with a lot of the abstractions and tooling which makes app deployment a breeze – the notion of applications (containerized via Docker, hence the name), and deployments, for example. It takes care of your HTTP routing (e.g. as sub-domains, depending on your virtualhost settings) with an automatically-managed nginx instance, and can be extended through plugins to set up databases and other services right on your local machine.
Before you move on to the next section, please also make sure that your local machine’s SSH key is authorized with your Dokku installation – this is done either during first setup, or by adding your key manually.
For the development of the actual Ktor application, you should preferably have the latest version of IntelliJ IDEA.
With these things out of the way, we can get straight into the actual process!
Creating our Ktor application
For simplicity’s sake, we can use the same simple “Hello, World” application shown in the tutorial for [Ktor on Heroku]({% post_url 2021-01-15-Kotlin-on-heroku %}), so I’m going to keep this section brief. (Should you already have a Ktor project which you want to deploy, you can skip to the next section directly.)
We can easily create a new Ktor project either via the online generator available at https://start.ktor.io/, or use the Ktor IntelliJ IDEA plugin (both of which expose the same configuration options). I’m using the Ktor plugin (which can be accessed through File | New… | Project once installed). Here, we enable the “Gradle Kotlin DSL” option for the project, and add the “Routing” feature:
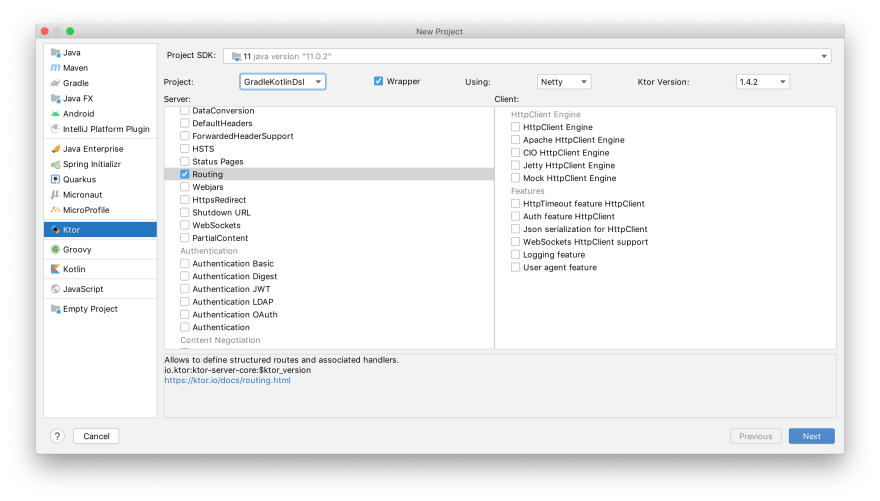
We input our desired project name and artifact ID on the pages that follow in the wizard. After waiting for Gradle to import, we have a ready-to-run minimal Ktor “Hello World” project. As usual, we can run it locally by navigating to the Application.kt file in our source directory, and pressing the “Run” button in the gutter next to the main function.

With the minimal local application setup done, we can move on to the interesting part – configuring the application Kotlin app to run on Dokku!
Configuring our Ktor application for Dokku deployment
Dokku (and the Gradle buildpack it ships with) requires our application to fulfil three criteria (the same requirements as for Heroku):
- Our application must respect the
PORTenvironment variable: Dokku assigns our application a port on which to listen for incoming requests, and Dokku’snginx-based proxy then brings HTTP traffic to our application on that port. As specified in the documentation, this port is usually5000– but this is not guaranteed, so it’s important we rely on the environment variable instead. - Our application needs to provide a
stagetask: Dokku uses this task via Heroku’s Gradle buildpack to turn our program into an executable when deploying. - Our application needs to provide a
Procfile: This file specifies the command(s) which will be run when the application is started (more on this topic here) – so we need to point it at the executable which was generated during deployment.
Let’s briefly go over what we need to do to fill in each of the three criteria.
The PORT environment variable
Because the Ktor wizard comes with a clever default configuration, we don’t actually need to make any changes here – our app is already configured to respect the PORT environment variable. We can see this in the application.conf file in the resources directory of our project. This HOCON file sets the default port of our application to 8080, optionally overriding it with the content of the PORT environment variable when it is present:
ktor {
    deployment {
        port = 8080
        port = ${?PORT}
    }
    application {
        modules = [ io.sebi.ApplicationKt.module ]
    }
}
This is exactly what we want: When developing locally, our application is always assigned the same port, 8080, and when deploying to Dokku, the settings dictated by the environment are respected.
The stage Gradle task
Dokku uses Heroku’s buildpack mechanism to turn the source code of our project into an executable during deployment, which can be run when the application is started. For Gradle applications, the buildpack looks for a stage task to create executable artifacts. The Gradle application plugin, which is included by default if you’ve created your application through the Ktor wizard, already comes with a task called installDist which does exactly that. We can simply create an alias for it called stage. If you have picked the Gradle Kotlin DSL as was suggested earlier in the tutorial, you can simply use this snippet to create a task which does nothing but execute installDist:
tasks.create("stage") {
    dependsOn("installDist")
}
The Procfile
Procfiles tell Dokku which binary or script should be executed when our application is started by the platform. We want to point this file at the output generated by the stage task from the previous step. The Procfile only gets invoked once the stage task has already finished building our application, and a launch script in build/install/projectName/bin/projectName has been created. We point Dokku to this script to get our application running. In the root of our project, let’s create a file called Procfile and add the following content to it (with projectName being substituted with the name of our project):
web: ./build/install/projectName/bin/projectName
With this, we have prepared our application for deployment on Dokku! For now, these instructions were very similar to an app targeting Heroku (always great not having to learn the same thing twice!) – but this is also the point where configurations will start to become more Dokku-specific.
Actually deploying our application
Setting up a local Git repository
To get our source code onto our Dokku instance, we push it via Git – for that, we need a local repository and a Git remote which resides on our Dokku server, and that is associated with the “app” (the set of Dokku configurations relating to our project) we want to deploy.
For this, we need to create a local repository for our project, which can be done directly from IntelliJ IDEA with the command VCS | Enable Version Control Integration….
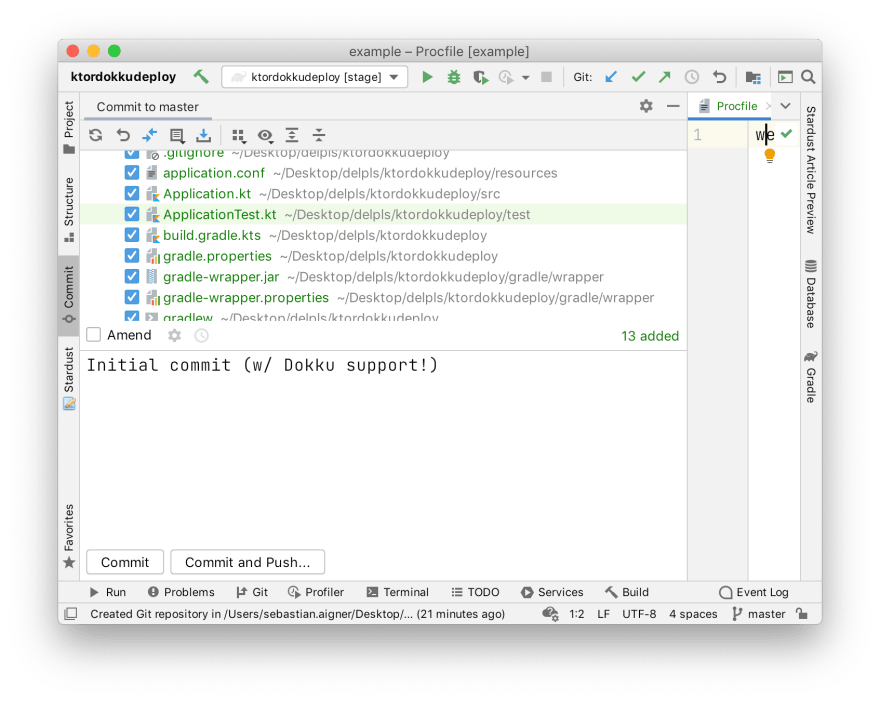
Next, we need to commit our project locally. In IntelliJ IDEA, navigate to the “Commit” tool window on the left side, and commit all unversioned files. (Don’t worry about manually excluding the /build or /idea folders – the Ktor project wizard already auto-generated a .gitignore file for us which takes care of them.)
Creating the Dokku application & Deploying! 🚀
Whereas Heroku comes with a fancy tool to create an application through a local command line via the Heroku CLI, doing the same on Dokku is a tiny bit more involved – but can still be done in a hot minute. Dokku’s docs (heh) contain extensive information about the general process. For us, it boils down to the following.
We establish a connection to our Dokku host via SSH, substituting my.dokku.host with the appropriate values:
ssh root@my.dokku.host
On the Dokku host, we create a new app for our Ktor application:
root@my.dokku.host:~# dokku apps:create myprojectname
-----> Creating myprojectname...
This sets up a set of configurations for our application on the server, and also sets up a Git repository on our Dokku server.
Once the creation process has finished, it’s time to go back to our local application and wire up this new Git remote. Every time we want to deploy a new version of our application, we will simply push to that remote, Dokku will trigger our buildpack, and start our application.
There are two simple ways to add our Dokku host as a Git remote for our local repository: via the command line, and via IntelliJ IDEA’s Git user interface.
To add the remote via the Git command line client, we execute the following command in the root of our local project, substituting my.dokku.host and myprojectname for the appropriate values:
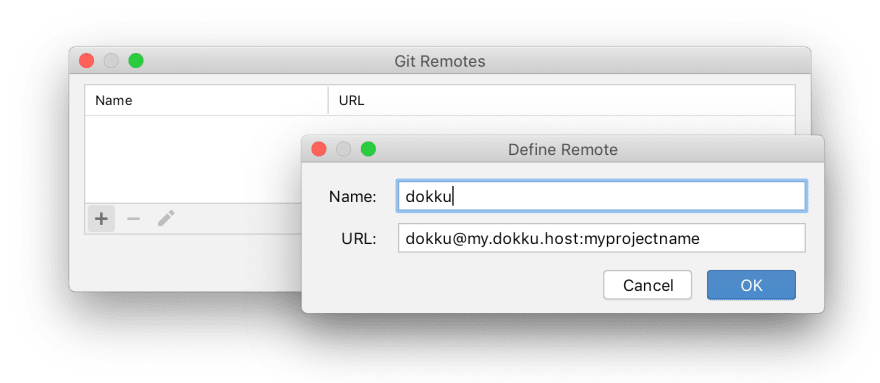
git remote add dokku dokku@my.dokku.host:myprojectname
This adds a remote called dokku which points to a Git repository on my.dokku.host called myprojectname which is associated with the Dokku app and configuration of the same name.
We can also use the IntelliJ IDEA user interface to do the same thing. To add the remote, we navigate to VCS | Manage Remotes….
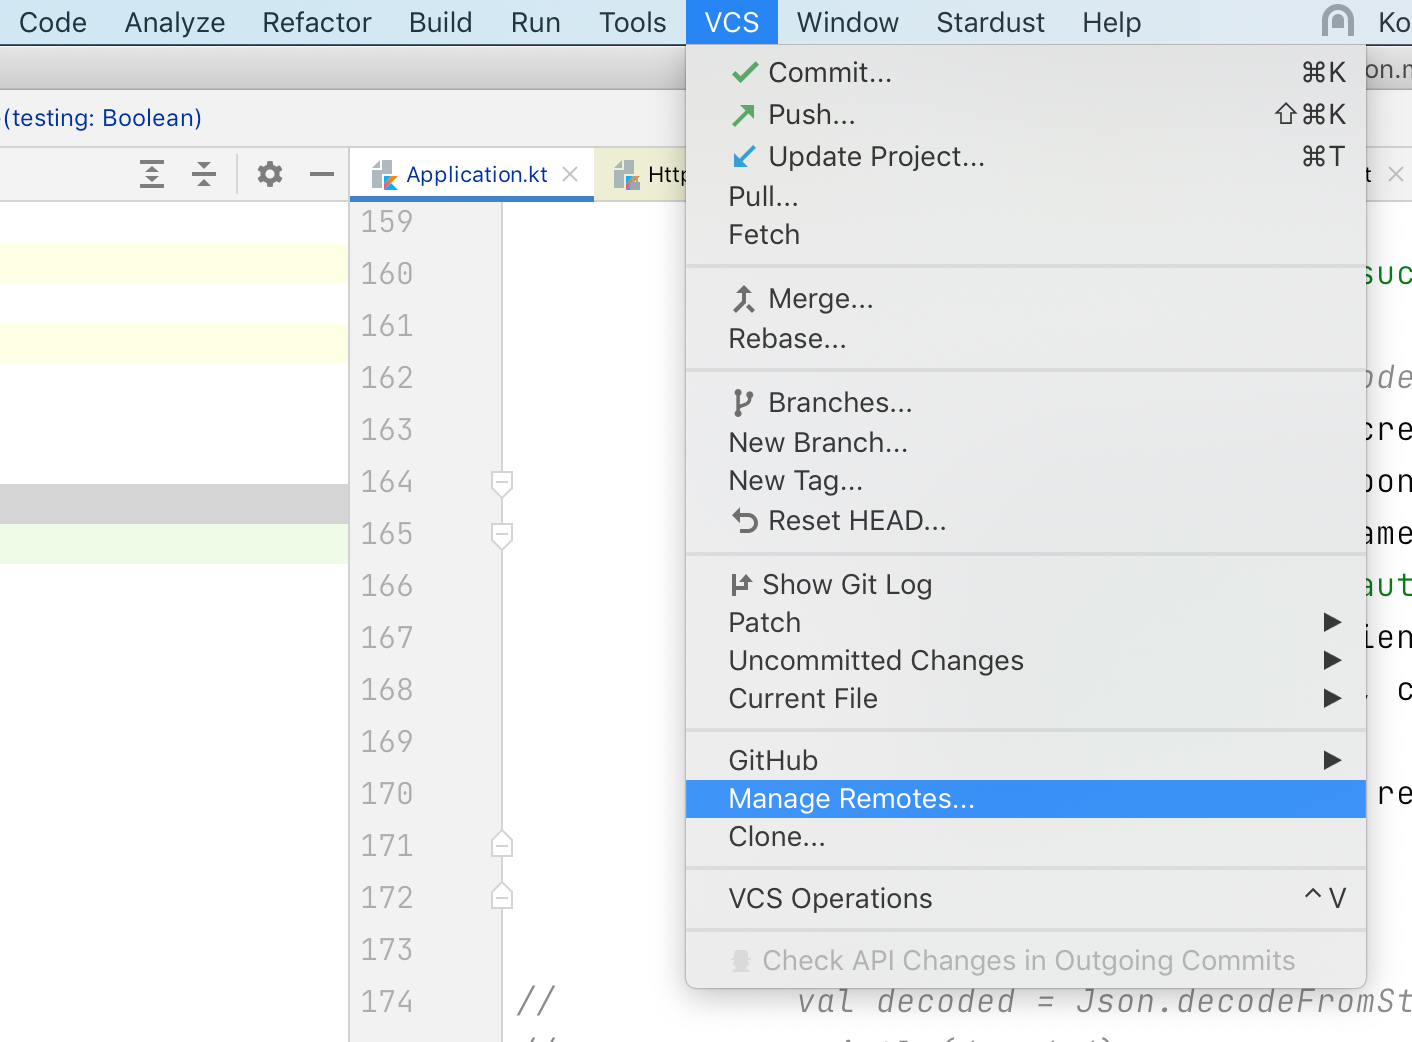
This opens up a new window which allows us to, as the name suggests, manage our Git remotes. By pressing the “+” button, we define a new remote, and fill in the required information – we call the remote dokku and set its URL to dokku@my.dokku.host:myprojectname, substituting host and project name:
Just like that, we’re ready for lift-off! We trigger the deploy of our application to our Dokku instance by pushing the commit we made in the previous section to the dokku Git remote we just introduced. We can do this via IntelliJ IDEA through VCS | Git | Push…, or via git push on the terminal.
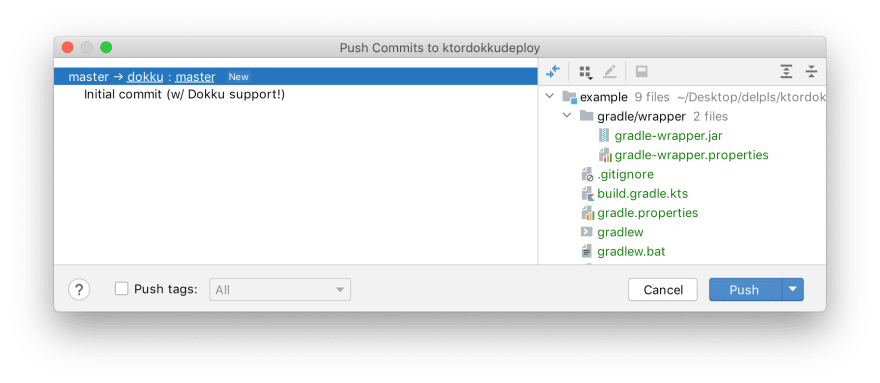
We confirm the push, and now just have to wait until our application arrives on our Dokku instance! This push is going to take longer than you might be used to, because Dokku builds our application immediately when we push it (and even rejects the push if the application fails to build!). If you’re interested in following along with the progress, you can open the “Git” tool window at the bottom of IntelliJ IDEA to see what is happening in the background. If everything has gone according to plan, you will see a confirming message in the logs:
remote:        BUILD SUCCESSFUL in 1m 29s
remote:        6 actionable tasks: 6 executed
remote: -----> Discovering process types
remote:        Procfile declares types -> web
remote: -----> Releasing myprojectname...
remote: -----> Deploying myprojectname...
remote: -----> App Procfile file found
remote: -----> DOKKU_SCALE file exists
remote: =====> Processing deployment checks
remote:        No CHECKS file found. Simple container checks will be performed.
remote: -----> Attempting pre-flight checks (web.1)
remote:        Waiting for 10 seconds ...
remote:        Default container check successful!
remote: -----> Running post-deploy
remote: -----> Creating new app virtual host file...
remote: -----> Configuring myprojectname.my.dokku.host...(using built-in template)
remote: -----> Creating http nginx.conf
remote:        Reloading nginx
remote: -----> Renaming containers
remote:        Renaming container (7405ef19e607) vibrant_curran to myprojectname.web.1
remote: -----> Checking for postdeploy task
remote:        No postdeploy task found, skipping
remote: =====> Application deployed:
remote:        http://myprojectname.my.dokku.host
Let’s navigate to the link of our project, which we can see in the last line, and observe our application, running on our Dokku instance! Just like that, you get to celebrate the deployment of your application on the net!

What’s next?
As you may have noticed, our application is available on our Dokku host now – but only in an unencrypted fashion (note the lack of https in the address bar). Thankfully, we live in the age of LetsEncrypt offering free TLS certificates, and Dokku makes it easy to enable automatic certificate retrieval and setup for our application via the dokku-letsencrypt plugin. I strongly recommend setting up this plugin so that people using our application can enjoy securely encrypted web-traffic. Once installed (see installation and initial setup instructions), we can enable the LetsEncrypt integration for our application with a single command:
root@my.dokku.host:~# dokku letsencrypt myprojectname
Like other convenient Platforms as a Service, Dokku provides a ton of plugins which allow you to equip your application with self-hosted databases, key-value-stores, search indices, and more. Explore the plugins page in Dokku’s documentation and see for yourself what plugins are available. With just a few shell commands, you can enable all of them for your Ktor application as well, and use them directly from your Kotlin code. And because you are hosting your own Dokku instance, you won’t be billed on the number of rows in your database or how many megabytes of object storage your application is using.
Generally, we have seen how to set up a simple workflow for publishing new changes of our Kotlin application to our Dokku server: make the change, commit the change, push the change to dokku master – and after just a minute or two, our change will be visible when visiting the URL of our application on our Dokku host.
Thank you for reading! 🤗
I really enjoy using Dokku for deploying my side-projects to the web, because for me personally, it strikes the perfect balance between convenience (I don’t have to spend too much time on the ops part of devops) and control (I can still own the infrastructure, and it’s easy for me to provision new services at no extra cost, even when I use them intensively).
I hope you found this tutorial helpful. If you have any questions or ideas about what to cover next, please let me know, and get in touch here or on Twitter!